Sunday, September 25, 2011

Clutch and rust proofing...

The clutch is now free; just went under the car with a screw driver.

I have done a rust proofing on this car. After years of taking pictures and doing rust proof on cars I have finally put a document together. This will help for future jobs.

http://philcaron.com/docs/SM_rust_proofing.pdf


Saturday, September 24, 2011

Clutch slave cylinder.

 Found some oil on the floor...

 I thought that it was from the gearbox, but after looking up I saw that it was coming from the slave cylinder.


The leak tube was too short and ending right next to the brake rotor. 


The piston came out by itself; the O ring was hard and worn. I've polished the piston and change the O ring for the bleed screw (Same O ring than a plate connector). I've straightened the tube with a heat gun; now it ends below the cross member.


I had an issue with the return hose from the regulator; it was rubbing against the fans of the alternator pulley. Changed the hose and rerouted it.


I thought the car was finished but the clutch is stuck. We will deal with this today.


Wednesday, September 21, 2011

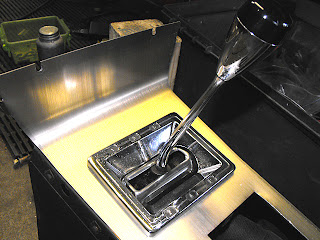
Console: Finished.

The console is finished; the hand brake, shifter and electrical are hooked up. The seat is also back on and she is drivable. I have to bleed the front brakes before delivery.


Next: Rustproofing.

Tuesday, September 20, 2011

Exhaust finished, front suspension cylinder and interior...

 The exhaust in finished.


The right side of the muffler was not supported.


Once I've started the engine, I've got rid of the exhaust leaks.


A lot of water came out from the exhaust.


About to start the front suspension cylinder; safety first...


I've changed the Oring in the cylinder as well as the ball and the boot. 


The hydraulic fluid filter was extremely dirty and the LHM is yellow.


The new hose is in place.


Time to start the engine... (Ignition switch failed after a few tries)


I removed most of the old glue and use Prep All for adhesion.
  

This is a product similar but thinner than Dynamat.


The console and the different stainless steel and chrome parts are cleaned and polished; ready to go in.


Monday, September 19, 2011

Accessories done and starter installed.

This hose rubbed on the belt at some point; only a very thin layer of rubber is left.  


Oil change is done.


When I've re-installed the accessory shaft, I've noticed that it was very short,which would explain the two failing pumps in the passed. It was putting stress on the pump bearing.
  

The connector was too far in, you can see the difference between the above and below pictures.


 The starter arrived and is in.


Friday, September 16, 2011

Putting accessories back on...

 Ready to put the accessories back on.


The return hose showed some ware...


... I've replaced it with a 9.5mm injection hose + a brass fitting.


Accessories back on.


I've clean the gearbox with mineral spirit and the device I use for rustproofing.


As clean as a whistle.


Gear box is closed with some Red Line MT90 in it.


The nut on the bracket for the HP pump is stripped... 


Drilled the welded nut to make a cage...


... and welded a new nut.


Some brown paint to finish the job.


Wednesday, September 14, 2011

Rear boots, gear box...

Since I had to change to boots on the rear suspension, I've also replaced the Orings.
It's important to clean the grove where the Oring sits; dirt gathers at the bottom of the groove and the Oring cannot seal properly at that spot.


I use fabric tape (Used for wiring harnesses) to protect the boot from the Ligarex. 


I have ground both rods, replaced the balls and one ball boot.


The rear left piston is scored 


I've polished it; it is mainly when the car is down, so it should not affect the pressure keeping while the car is at driving level. It would be a good idea to find a replacement piston in the mean time though


Both sides are done and the wheel are back on; they need to be torqued once the car is on the ground.


Starting on removing the accessories in order to open the gear box.


The air filter should be replaced.


Interesting plastic connector... I will replace this with a brass one.


Did not disconnect the compressor to keep the refrigerant. 


For reference only.


Ready to clean the gearbox...